In our ongoing exploration large language models (LLMs), we've discussed how base models alone usually aren't enough to build more advanced LLM-enabled applications.
Instead, we often want to make use of custom knowledge bases, vector databases for long term memory, chaining together multiple prompts, and so on.
Fortunately, LangChain provides a toolkit for all these LLM primitives with prompt templates, agents, tools, memory, and chains.
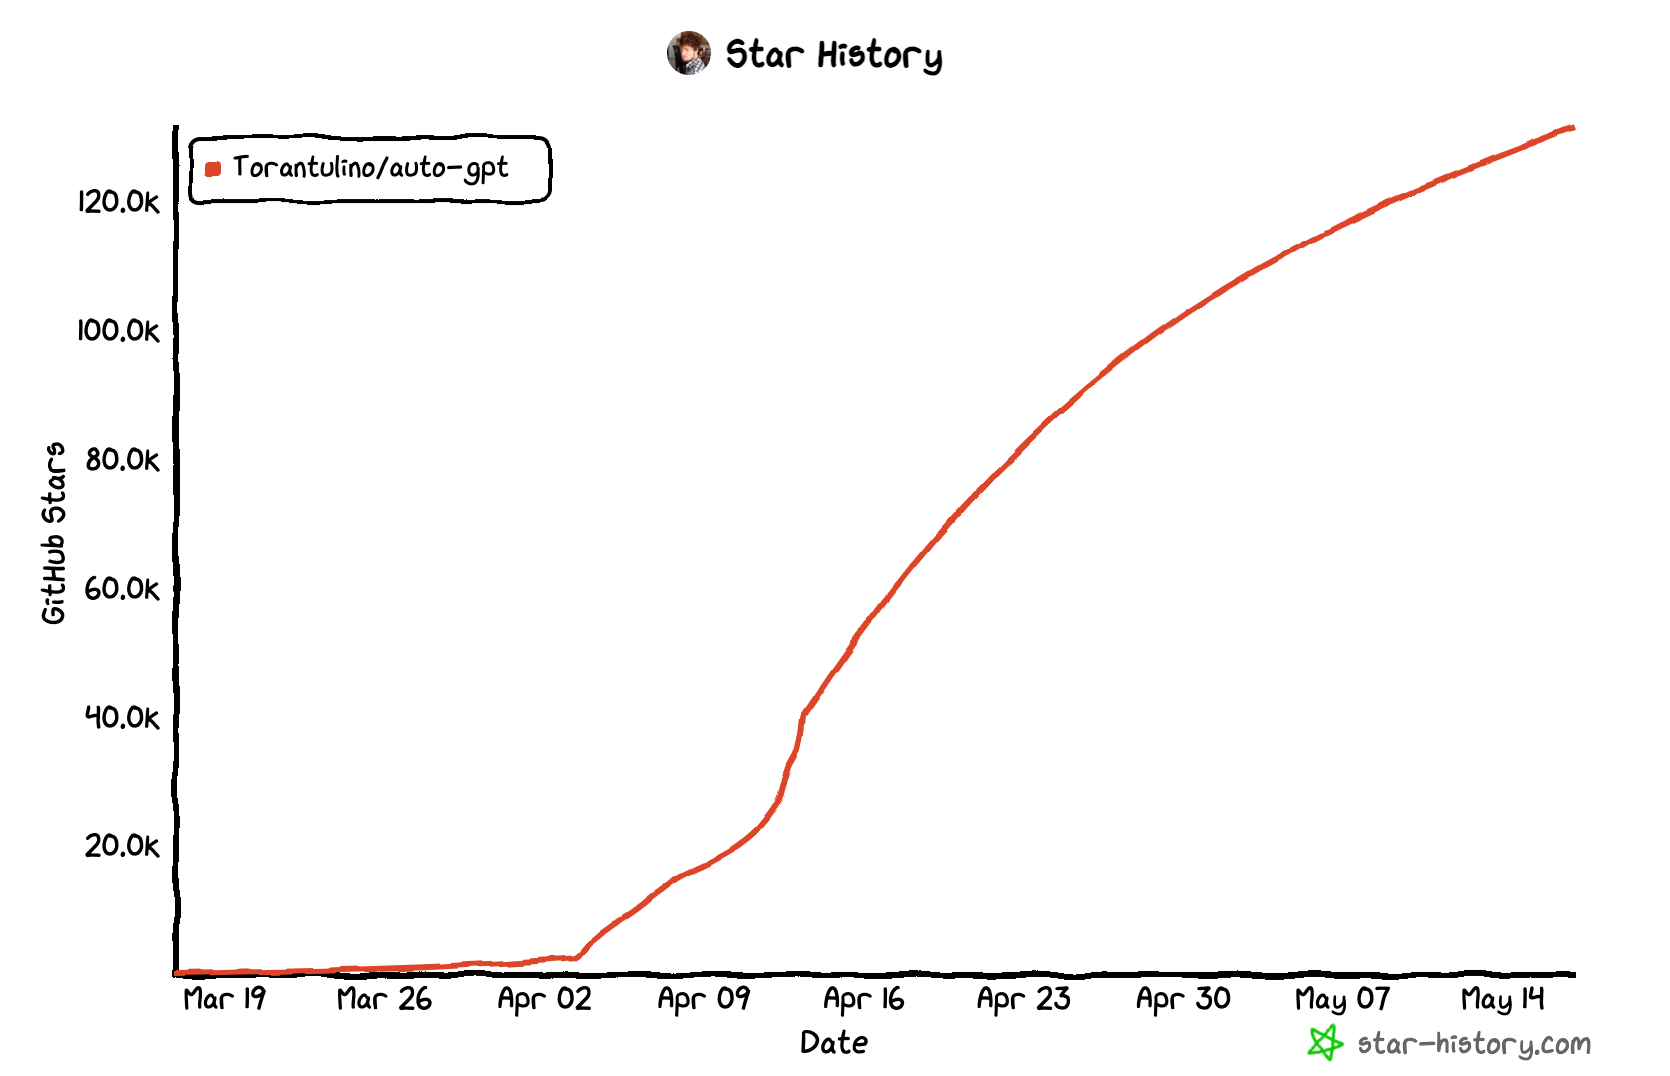
In this guide, we'll build on our previous LangChain tutorials and see how we build an implementation of the fastest growing GitHub repo in history: AutoGPT:
Auto-GPT is an experimental open-source application showcasing the capabilities of the GPT-4 language model. This program, driven by GPT-4, chains together LLM "thoughts", to autonomously achieve whatever goal you set.
In particular, for this guide we'll walk through LangChain's implementation of AutoGPT, which reconstructs this viral project but with LangChain primitives including LLMs, PromptTemplates, VectorStores, Embeddings, and Tools.
We'll also build a simple frontend for this LangChain-enabled AutoGPT agent using Streamlit:
This guide will cover the basic implementation of AutoGPT using LangChain, although in future guides we'll discuss how we can actually build this type of automated AI assistant from scratch using the aforementioned LLM primitives, giving us even more control our agents behaviour.
For this guide, our automated AI assistant will be capable of searching the web, as well as reading and writing files in order to accomplish tasks. It will also be equipped with Facebook AI Similarity Search (FAISS), an open-source library that enables:
...efficient similarity search and clustering of dense vectors.
We will also use an in-memory document store and use OpenAI Embeddings API for semantic understanding.
Alright, now that we know what we're building, let's dive in and see how we can build a simple implentation of AutoGPT using LangChain and Streamlit.
Step 1: Setting up the environment
To start, let's first import the necessary libraries and setup our environment. First we'll need to pip install the following packages:
pip install streamlit langchain faiss-cpu openai google-search-results tiktokenNext, we'll create a file called app.py in our project and import the following packages, a few important ones include:
SerpAPIWrapperfrom LangChain for web searchingWriteFileToolandReadFileToolfor managing our filesfaiss&OpenAIEmbeddingsfor semantic search & understanding user queriesAutoGPTfrom Langchain's experimental moduleChatOpenAIfor our chat model, which uses GPT 3.5
import streamlit as st
from langchain.utilities import SerpAPIWrapper
from langchain.agents import Tool
from langchain.tools.file_management.write import WriteFileTool
from langchain.tools.file_management.read import ReadFileTool
from langchain.vectorstores import FAISS
from langchain.docstore import InMemoryDocstore
from langchain.embeddings import OpenAIEmbeddings
from langchain.experimental import AutoGPT
from langchain.chat_models import ChatOpenAI
import faiss
from contextlib import redirect_stdout
import json
import os
import re
We'll also a file called apikey.py and store the following API keys, which we'll import back into our app.py file:
from apikey import OPENAI_API_KEY, SERPAPI_API_KEY
os.environ['OPENAI_API_KEY'] = OPENAI_API_KEY
os.environ['SERPAPI_API_KEY'] = SERPAPI_API_KEY
Step 2: Customizing the agent's parameters
Next up, we want to set up a few model parameters for our AutoGPT implementation that can be adjusted by users.
To do so, let's create a sidebar so that users can specify their AI name, the AI role, and the temperature to control randomness (i.e. creativity) in the responses:
st.sidebar.title("AutoGPT Parameters")
ai_name = st.sidebar.text_input(
    "AI Name",
    value="Q",
    help="Enter the name of your AI agent.",
)
ai_role = st.sidebar.text_input(
    "AI Role",
    value="Research Assistant",
    help="Enter the role of your AI agent.",
)
temperature = st.sidebar.slider(
    "Temperature",
    min_value=0.0,
    max_value=1.0,
    value=0.0,
    help="Set the randomness of the AI's responses. Higher values produce more random outputs.",
)
Step 3: Setting up tools & memory
Next up, let's go an set up the tools and memory our AutoGPT agent will have access to. For now, the tools we'll include a a search function that uses SerpAPI for searching the web, a WriteFileTool, and ReadFileTool for file management.
search = SerpAPIWrapper(serpapi_api_key=SERPAPI_API_KEY)
tools = [
    Tool(
        name = "search",
        func=search.run,
        description="useful for when you need to answer questions about current events. You should ask targeted questions"
    ),
    WriteFileTool(),
    ReadFileTool(),
]
Next, we'll set up our memory using FAISS and the InMemoryDocstore from LangChain.
We'll also instantiate our embeddings model using OpenAI Embeddings from LangChain. These embeddings will enable our agent to understand the semantic meaning of user queries, as well as documents in the memory:
embeddings_model = OpenAIEmbeddings()
embedding_size = 1536
index = faiss.IndexFlatL2(embedding_size)
vectorstore = FAISS(embeddings_model.embed_query, index, InMemoryDocstore({}), {})
Step 4: Instantiating LangChain's AutoGPT implementation
Now we're ready to instantiate LangChain's experimental AutoGPT implementation, in which we use the from_llm_and_tools method to provide details about our agent, including the memory and tools we've setup.
Also, we'll be using the ChatOpenAI module from LangChain, which is a wrapper around OpenAI’s ChatModel i.e. GPT 3.5 or GPT 4.
agent = AutoGPT.from_llm_and_tools(
    ai_name=ai_name,
    ai_role=ai_role,
    memory=vectorstore.as_retriever(),
    tools=tools,
    llm=ChatOpenAI(temperature=temperature),
)
Step 5: Setting up a custom output stream
Okay now that we've got our AutoGPT agent ready, let's setup a custom output stream so that we can capture and display the models output in a (relatively) user-friendly way.
For this simple demo, the StreamlitOutput class is designed as a custom output stream in order to integrate Python's IO capabilities with the Streamlit interface. We're also adding a some logic to capture any file paths mentioned (i.e. research_report.txt) in the output, as we will want to download these files later.
Let's break down this class step-by-step:
- First we initialize a
bufferattribute as an empty string, which will be used to store the output data that comes from the model. - Next, we
writeto the buffer to write the output data to the buffer. Here we also check if the data contains 'File written successfully to' as we want to keep track of the text file names the model creates. If the file path isn't' in thest.session_state.file_pathsit gets added, which allows us to keep track of all the files written during the session, as sometimes there are multiple. - Finally, an instance of
StreamlitOutputis created and stored in theoutputvariable for use later
class StreamlitOutput:
    def __init__(self):
        self.buffer = ""

    def write(self, data):
        self.buffer += data
        if 'File written successfully to ' in data:
            match = re.search(r'File written successfully to ([\w\.-]+)\.', data)
            if match:
                file_path = match.group(1)
                if 'file_paths' not in st.session_state:
                    st.session_state.file_paths = []
                if file_path not in st.session_state.file_paths:
                    st.session_state.file_paths.append(file_path)

output = StreamlitOutput()
Step 6: Loading files
Next up, let's create a load_files function to load the files created by our agent in the current session. This function is called when the Run button is pressed in the app, and allows users to download the files created.
Let's break down line by line:
- First we check if
file_pathsexists in the session state - If the file path exists in the session state, we then iterate through each file path
- For each file path, we also check if the file still exists, as it's possible that files can be deleted after they're written
- If the file still exists, we open it in read binary mode and read the file data. We then create a download button using
st.download_button. We also use the file path for the name and key of the download button. - If the file path doesn't exist anymore, we remove it from our list of files
- Lastly, if
file_pathsdoesn't exist in the session state, we create it as an empty list.
In other terms, this function keeps track of all files the agent has made, checks if they still exist, and provides a button download for each one in Streamlit:
def load_files():
    # If 'file_paths' exists in the session state, iterate through each file path
    if 'file_paths' in st.session_state:
        for file_path in st.session_state.file_paths:
            # Check if the file still exists
            if os.path.exists(file_path):
                # If the file exists, create a download button for it
                with open(file_path, "rb") as file:
                    file_data = file.read()
                st.download_button(
                    label=f"Download {os.path.basename(file_path)}",
                    data=file_data,
                    file_name=os.path.basename(file_path),
                    mime="text/plain",
                    key=file_path  # Use the file path as the key
                )
            else:
                # If the file doesn't exist, remove it from 'file_paths'
                st.session_state.file_paths.remove(file_path)
    else:
        # If 'file_paths' doesn't exist in the session state, create it
        st.session_state.file_paths = []
Step 6: Create the interface & running the agent
We're now ready to create our simple Streamlit interface that allows users to input their queries or commands. Once they press the 'Run' button, the user input is passed to the agent, whihc processes it and generates an output.
Here's a breakdown of the code
- First we set the title with
st.title - Next, if no user input has been saved in the session state, we initialize
st.session_state.user_inputas an empty string. - Then we create a text input field, which is is saved to
st.session_state.user_input. if st.button('Run'):: When the 'Run' button is clicked, it runs the AutoGPT agent with the user's input and the output is saved tost.session_state.model_outputandst.session_state.result.- The
load_files()function is then called after running the model to load any files generated by the model's output.
st.title('AutoGPT using LangChain')

if 'user_input' not in st.session_state:
    st.session_state.user_input = ""
st.session_state.user_input = st.text_input("Please enter your command", st.session_state.user_input)

if st.button('Run'):
    if st.session_state.user_input:
        with redirect_stdout(output):
            result = agent.run([st.session_state.user_input])
        st.session_state.model_output = output.buffer
        st.session_state.result = result
        load_files()
        st.session_state.files_loaded = True
Next, we re-render download buttons if any of them were clicked. This is a known issue with Streamlit where clicking the download button refreshes the page and we lose the button, so this is workaround.
- Here it checks if the
file_pathsexist in the session state, and for each file it generates a unique widget key and checks if the button was clicked. If the download was clicked, it simply re-loads the files
# If any of the download buttons was clicked, re-render them
if 'file_paths' in st.session_state:
    for index, file_path in enumerate(st.session_state.file_paths):
        widget_key = f"{file_path}_{index}"  # Use the unique widget key
        if st.session_state.get(widget_key, False):  # Check if the button was clicked
            load_files()
Finally, the last step is to display the model's output (i.e. all the thoughts, reasoning, plan, and action) if it exists in the session state. This is again to persist the model output after the page reloads from the download button:
# Display the model output if it's in the session state
if 'model_output' in st.session_state:
    st.write(f"Result: {st.session_state.result}")
    expander = st.expander("Model Output")
    expander.text(st.session_state.model_output)
And that's all we need for now! Let's go and test it out with something simple, like the weather in Amsterdam today...
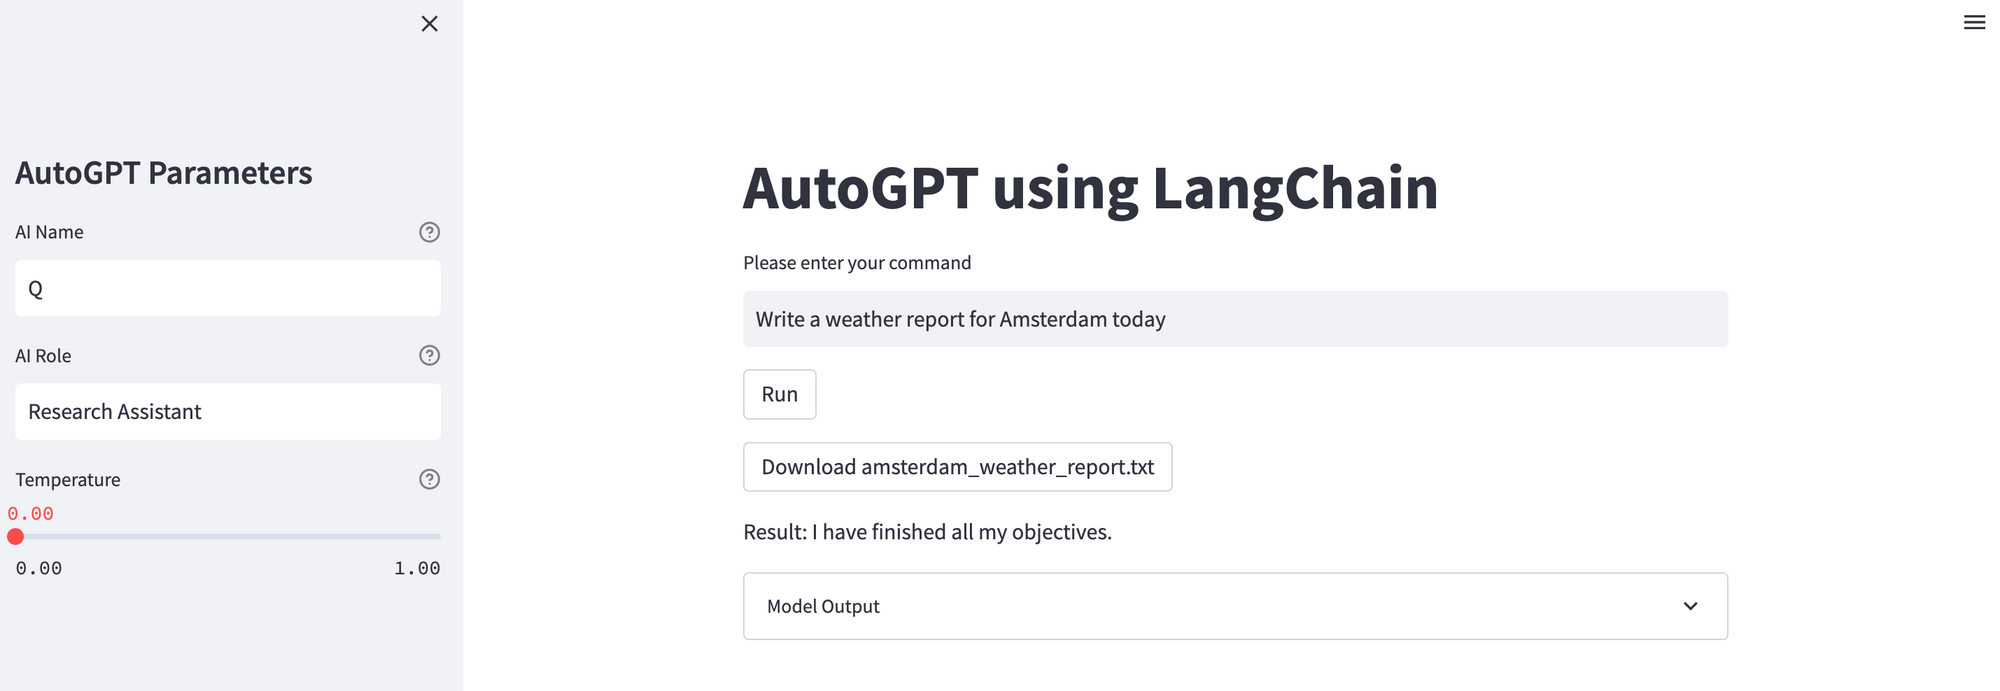
If we check out the model output, we can see the AI thoughts, reasoning, and so on in a JSON-formatted string response, for example:
AI: {
    "thoughts": {
        "text": "I have found a reliable weather source for Amsterdam today. I should write the weather report now.",
        "reasoning": "I have the information I need to write the weather report, so I should write it now.",
        "plan": "- Write the weather report",
        "criticism": "I need to make sure that I accurately report the weather conditions.",
        "speak": "I will write the weather report now."
    },
    "command": {
        "name": "write_file",
        "args": {
            "file_path": "amsterdam_weather_report.txt",
            "text": "Amsterdam Weather Report for Today:\n\nThe weather in Amsterdam today is expected to be mostly cloudy with a high of 57°F (14°C) and a low of 44°F (7°C). There is a chance of rain throughout the day, with a 60% chance of precipitation. Wind speeds are expected to be light, with gusts up to 10 mph (16 km/h).",
            "append": false
        }
    }
}
And here's the final response:
The weather in Amsterdam today is expected to be mostly cloudy with a high of 57°F (14°C) and a low of 44°F (7°C). There is a chance of rain throughout the day, with a 60% chance of precipitation. Wind speeds are expected to be light, with gusts up to 10 mph (16 km/h).
It's accurate, the future is here...
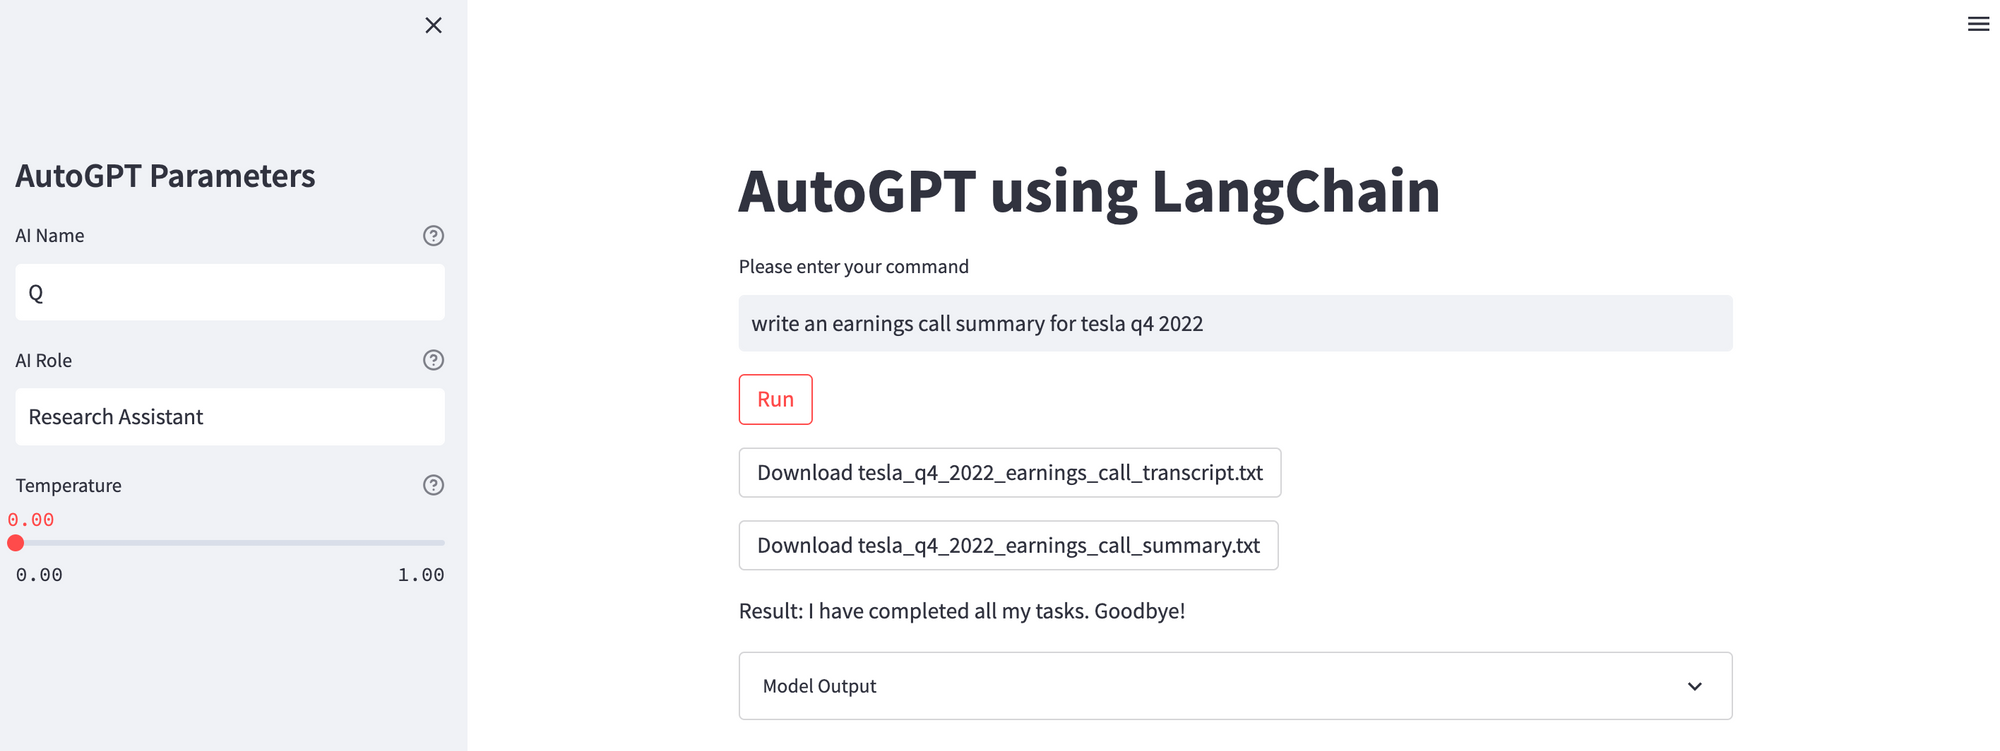
Ok, let's try slightly more difficult task...writing an earnings call summary for Telsa Q4 2022.
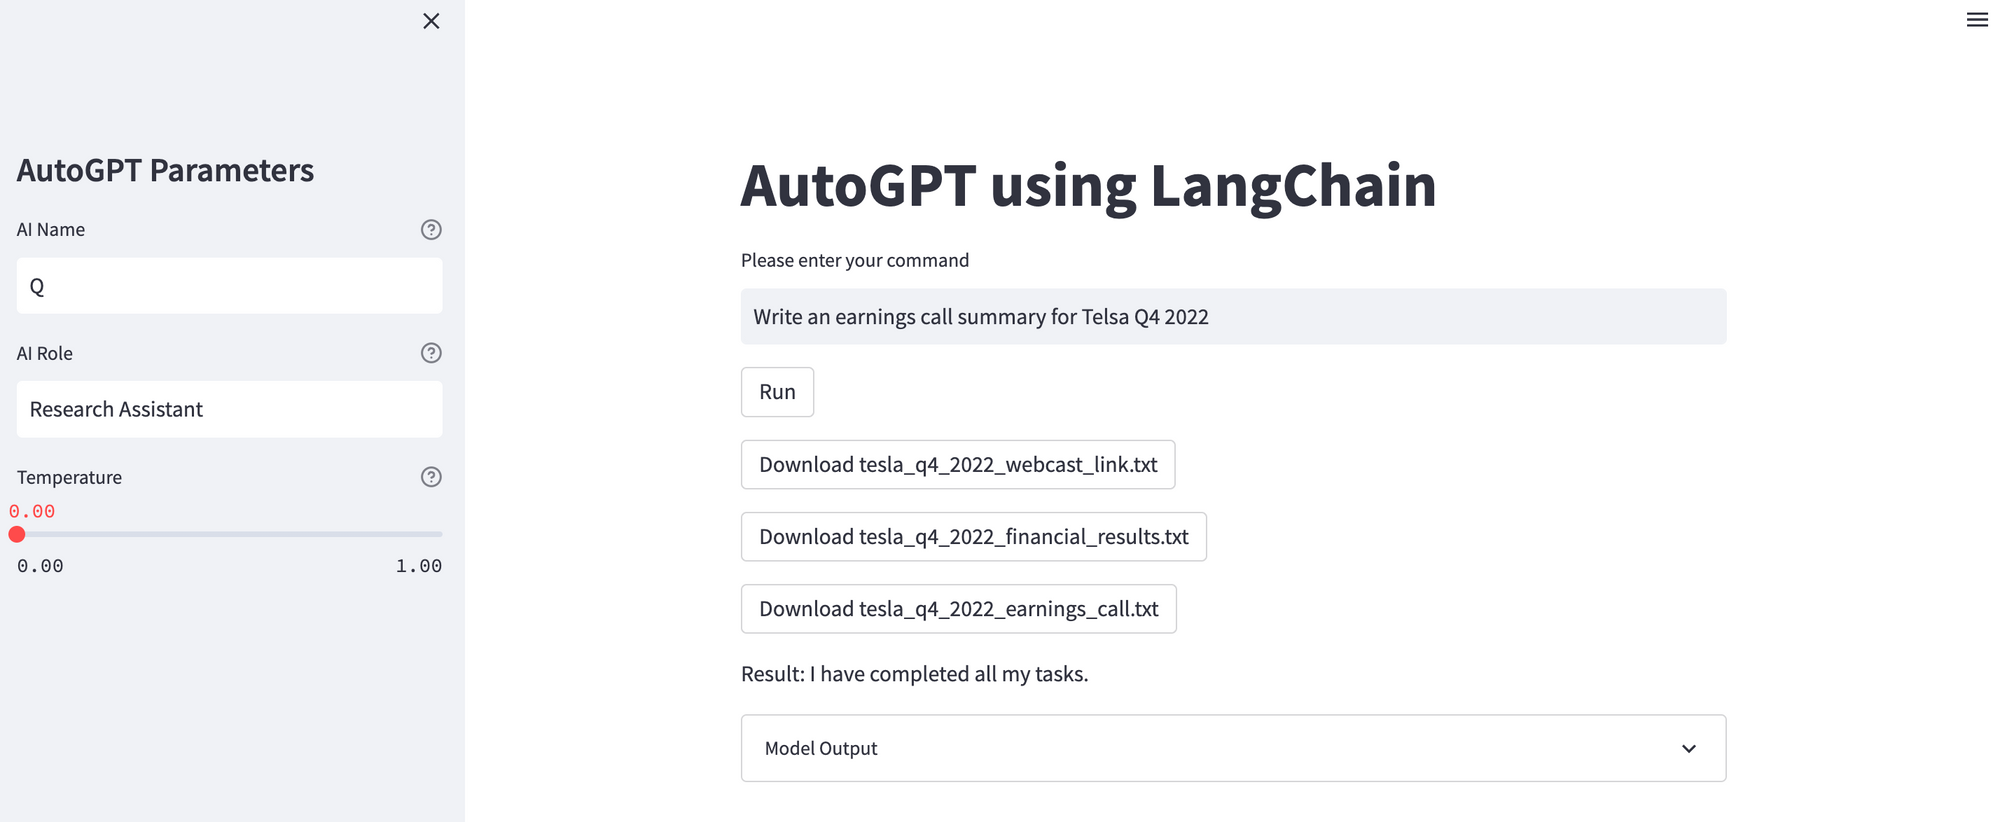
Here's the response:
Tesla just reported fourth-quarter earnings for 2022 including revenue of $24.32 billion, and earnings per share of $1.19. Automotive revenue amounted to $21.3 billion in the three months ending 2022, and included $324 million of deferred revenue related to the company's driver assistance systems.
We can see this is also accurate, although not exactly a complete earnings call summary.
For that, we're going to need to add a bit more control back to our AutoGPT agents to ensure we're getting our desired output formate...although we'll save that for future articles.
Summary: Building Your Own AutoGPT with LangChain
In this guide, we saw how we can setup a simple implementation of AutoGPT using LangChain and LLM primitives such as Prompt Templates, Chains, Memory, Agents, and so on.
Although this is a good start, for future versions I'd like a bit more control over the agent, including creating dedicated LLM chains for particular tasks, more prompt engineering for specific tasks, adding more long term memory with a vector database like Pinecoen, and so on.
To do that, in the next few articles we'll discuss how we can build on this using LLM primitives with LangChain to build out more customized AutoGPT-like agents.
You can access the premium version of this tutorial, including a video walkthrough and all the code needed below:
 Peter Foy