

In our previous ChatGPT Plugins tutorials, we've covered how to setup a simple to-do list and build an AI news assistant.
In this guide, we'll build a new ChatGPT Plugin that acts as a stock screener assistant, meaning it retrieves and filters stocks based on the user's query.
To do so, we'll use the Financial Modeling Prep API, specifically the Stock Screener endpoint, and we'll host the code at Replit. To do so, the three main files we'll need to build this plugin include:
- A
main.pyfile to serve the API's functionality - A plugin manifest
ai-plugin.jsonto serve the metadata - An
openapi.yamlfile to document the API for ChatGPT
For example, with this plugin I can ask for things like...
Show me tech companies with a market cap above $1b and dividends above $2/share...
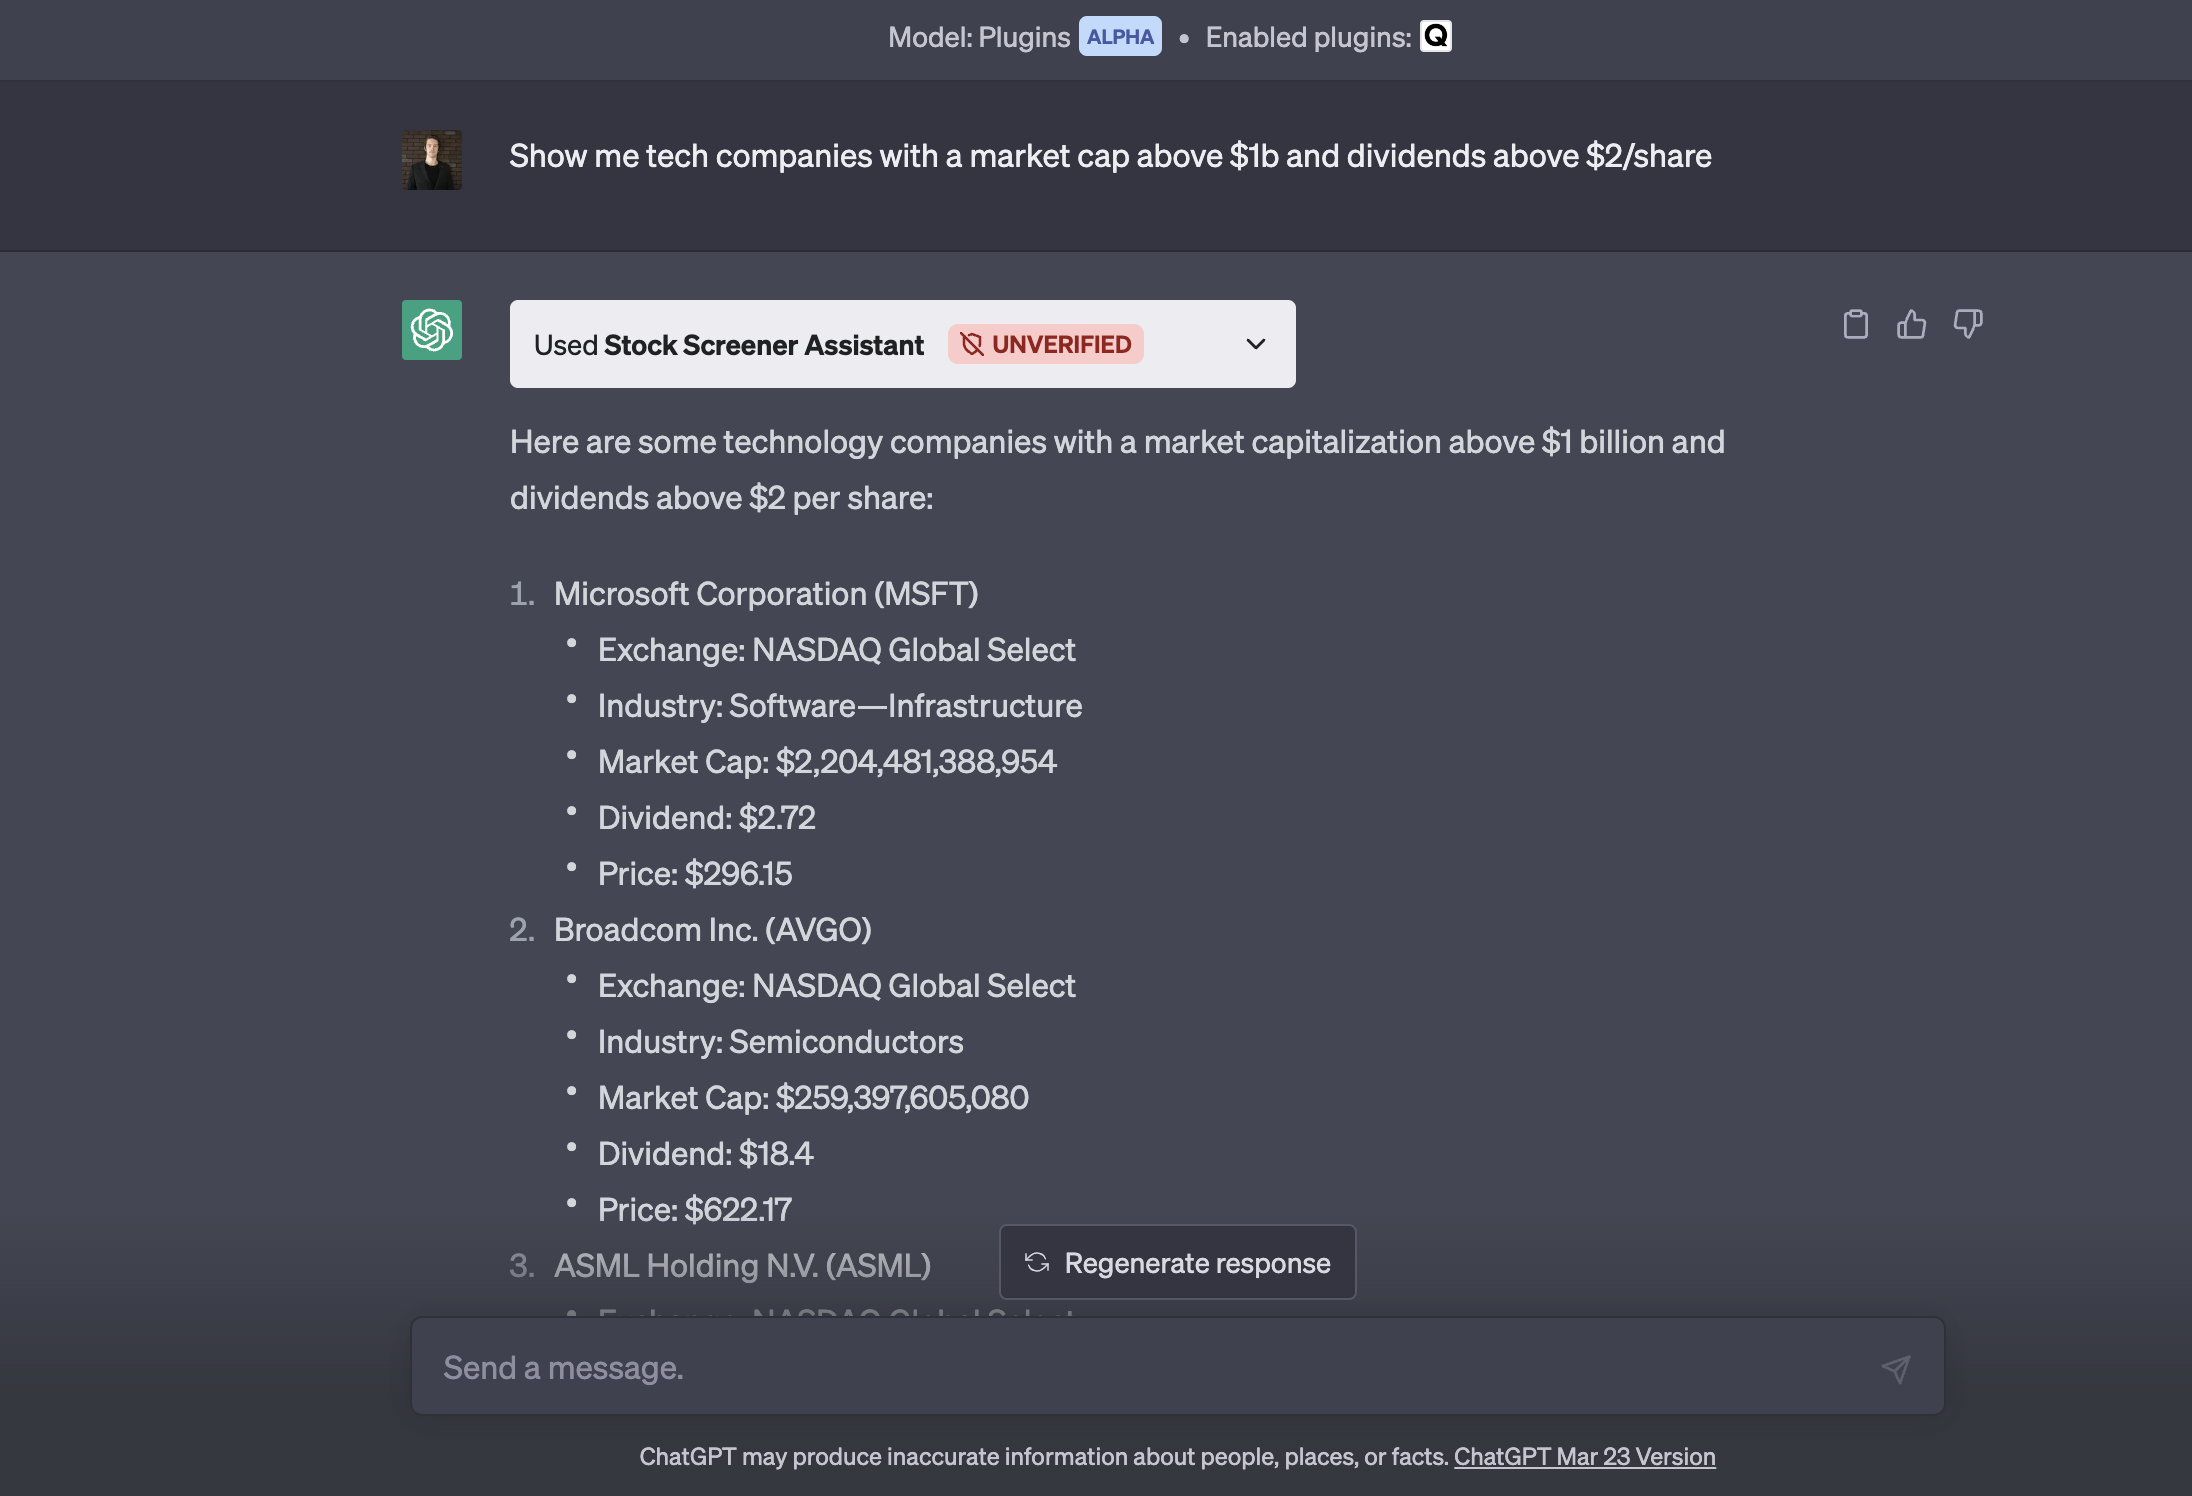
As you can see, the stock screen allows user's to specify their criteria such as:
- Market cap
- Sector & industry
- Dividends
- Beta, and so on
Alright, now that we know what we're building, let's get started with building the API functionality.
 Peter Foy
Step 1: Building the API functionality
To start, we'll create a new Python Repl and create a main.py file to serve our API's functionality and the other files we'll need.
Imports and constants
First, we'll import the necessary packages, initialize our Flask app, and define two API constants for the Financial Modeling Prep API:
import os
import logging
from logging import StreamHandler
from waitress import serve
from flask import Flask, request, jsonify, send_from_directory
import requests

app = Flask(__name__)

FMP_API_KEY = "your-api-key"
FMP_API_URL = "https://financialmodelingprep.com/api/v3"
Fetch stock screener data
Next, we'll define a stock_screener function that takes in the user-defined query parameters and sends a request to Financial Modeling Prep:
def stock_screener(**params):
  url = f"{FMP_API_URL}/stock-screener"
  params["apikey"] = FMP_API_KEY
  response = requests.get(url, params=params)
  if response.status_code == 200:
    return response.json()
  else:
    raise Exception(f"Error: {response.status_code}, {response.text}")
API route for fetching stock screener data
Next, we'll create an API route for handling incoming user-defined query parameters, calling the stock_screener function we just created, and returning the result in JSON format:
@app.route('/stock_screener', methods=['GET'])
def fetch_stock_screener():
  app.logger.info("Fetching Stock Screener")
  query_params = request.args.to_dict()
  screener_data = stock_screener(**query_params)
  return jsonify(screener_data)
Serving plugin files
Now that we've got our Financial Modeling Prep API functions in place, we need three more routes to serve the required ChatGPT plugin files, including the ai-plugin.json, the openapi.yaml, and the plugin logo:
@app.route('/.well-known/ai-plugin.json', methods=['GET'])
def send_ai_plugin_json():
  return send_from_directory('.well-known', 'ai-plugin.json')
Serve openapi.yaml:
Next, we need a route for serving the openapi.yaml file, which is used by ChatGPT to understand what the plugin can do and how to interact with the API endpoints:
@app.route('/openapi.yaml', methods=['GET'])
def send_openapi_yaml():
  return send_from_directory('.', 'openapi.yaml')
Serve plugin logo
Lastly, we'll create a route for serving the plugin logo:
@app.route('/logo.png', methods=['GET'])
def send_logo():
  return send_from_directory('.', 'logo.png')
With these API functions and routes in place, our Flask app is now setup to handle incoming requests from ChatGPT and serve the necessary files.
if __name__ == "__main__":
  app.run(host='0.0.0.0', port=int(os.environ.get('PORT', 8080))
Step 2: Creating the plugin manifest
Next, let's create the plugin manifest file, which:
...includes metadata about your plugin (name, logo, etc.), details about authentication required (type of auth, OAuth URLs, etc.), and an OpenAPI spec for the endpoints you want to expose.
For this plugin, we'll include the following information in our manifest:
- Name & description for both humans and the model
- User authentication, for this example we'll just set it to
none - API configuration, which includes the OpenAPI URL that you'll need to update with your Replit URL
- Logo URL and contact information
{
  "schema_version": "v1",
  "name_for_human": "Stock Screener Assistant",
  "name_for_model": "stockScreener",
  "description_for_human": "Plugin for fetching stocks based on various criteria like market capitalization, price, beta, volume, dividend, etc.",
  "description_for_model": "Plugin for fetching stocks based on various criteria like market capitalization, price, beta, volume, dividend, etc. Help users find stocks that meet their requirements.",
  "auth": {
    "type": "none"
  },
  "api": {
    "type": "openapi",
    "url": "https://your-repl-url.repl.co/openapi.yaml",
    "is_user_authenticated": false
  },
  "logo_url": "https://your-repl-url.repl.co/logo.png",
  "contact_email": "support@example.com",
  "legal_info_url": "http://www.example.com/legal"
}
As mentioned, you'll just need to update your-repl-url wiht the actual URL of your Repl. After creating the ai-plugin.json file, you'll also need to save it in the .well-known folder for ChatGPT to use it.
With our plugin manifest file in place, the last thing we need is to document our API with OpenAPI.
Step 3: Documenting the API with OpenAPI
In this step, we need to create an OpenAPI specification, which as OpenAI highlights:
The model will see the OpenAPI description fields, which can be used to provide a natural language description for the different fields.
In this case, all you'll need to update is the server URL here: https://your-repl-url.username.repl.co.
The OpenAPI specification then defines the /stock_screener endpoint and the parameters that user's can customize, including market cap, price, beta, dividends, and so on. Lastly, the components section defines the schema for JSON responses:
openapi: "3.0.2"
info:
  title: "Stock Screener Assistant API"
  version: "1.0.0"
servers:
  - url: "https://stockscreenerplugin.peterfoy2.repl.co"
paths:
  /stock_screener:
    get:
      operationId: fetchStockScreener
      summary: "Fetch Stock Screener"
      parameters:
        - in: query
          name: marketCapMoreThan
          schema:
            type: number
          required: false
          description: "Market capitalization greater than the specified value."
        - in: query
          name: marketCapLowerThan
          schema:
            type: number
          required: false
          description: "Market capitalization lower than the specified value."
        - in: query
          name: priceMoreThan
          schema:
            type: number
          required: false
          description: "Price greater than the specified value."
        - in: query
          name: priceLowerThan
          schema:
            type: number
          required: false
          description: "Price lower than the specified value."
        - in: query
          name: betaMoreThan
          schema:
            type: number
          required: false
          description: "Beta greater than the specified value."
        - in: query
          name: betaLowerThan
          schema:
            type: number
          required: false
          description: "Beta lower than the specified value."
        - in: query
          name: volumeMoreThan
          schema:
            type: number
          required: false
          description: "Volume greater than the specified value."
        - in: query
          name: volumeLowerThan
          schema:
            type: number
          required: false
          description: "Volume lower than the specified value."
        - in: query
          name: dividendMoreThan
          schema:
            type: number
          required: false
          description: "Dividend greater than the specified value."
        - in: query
          name: dividendLowerThan
          schema:
            type: number
          required: false
          description: "Dividend lower than the specified value."
        - in: query
          name: isEtf
          schema:
            type: boolean
          required: false
          description: "Is ETF (true/false)."
        - in: query
          name: isActivelyTrading
          schema:
            type: boolean
          required: false
          description: "Is actively trading (true/false)."
        - in: query
          name: sector
          schema:
            type: string
          required: false
          description: "Sector (e.g., Technology, Healthcare, etc.)."
        - in: query
          name: industry
          schema:
            type: string
          required: false
          description: "Industry (e.g., Software, Banks, etc.)."
        - in: query
          name: country
          schema:
            type: string
          required: false
          description: "Country (e.g., US, UK, CA, etc.)."
        - in: query
          name: exchange
          schema:
            type: string
          required: false
          description: "Exchange (e.g., NYSE, NASDAQ, etc.)."
        - in: query
          name: limit
          schema:
            type: integer
          required: false
          description: "Limit the number of results."
      responses:
        "200":
          description: "A list of stocks matching the given criteria."
          content:
            application/json:
              schema:
                type: array
                items:
                  type: object
                  properties:
                    symbol:
                      type: string
                    companyName:
                      type: string
                    marketCap:
                      type: number
                    sector:
                      type: string
                    beta:
                      type: number
                    price:
                      type: number
                    lastAnnualDividend:
                      type: number
                    volume:
                      type: number
                    exchange:
                      type: string
                    exchangeShortName:
                      type: string
Step 4: Deploying and testing the ChatGPT plugin
With these three files created, let's now go and deploy and test the new ChatGPT plugin. Here's what we need to do:
- After you've added all the necessary files to Replit, click "Run" to start the server and make the plugin available
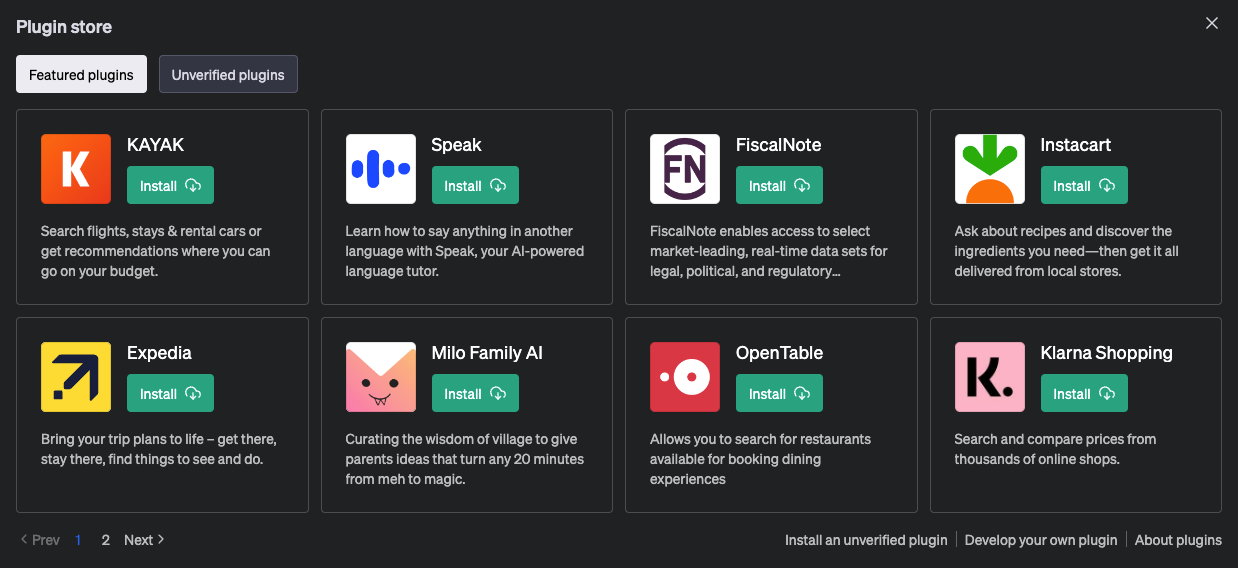
- Head to ChatGPT and navigate to the Plugin store
- Select "Develop your own plugin" and enter your Replit URL
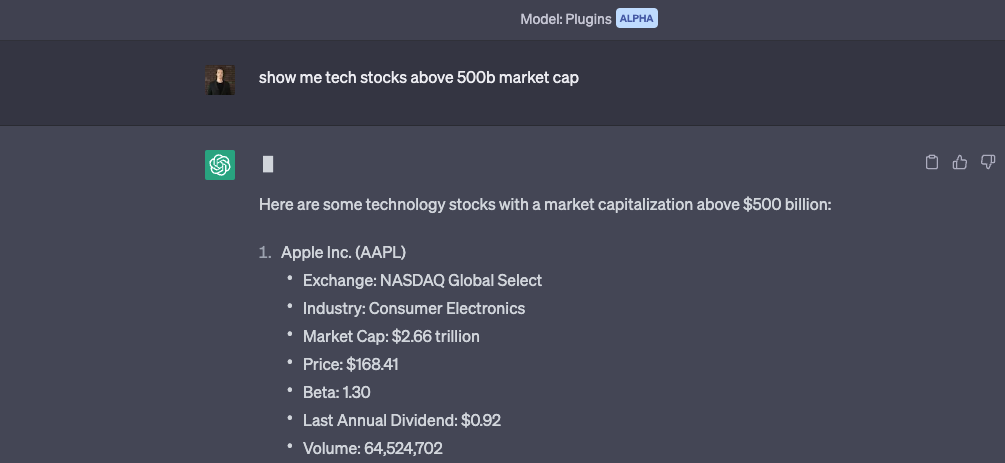
After installing and enabling the new plugin, you can test it out and specify your stock search criteria, and I can also confirm the market cap of Apple is correct at the time of writing:
Summary: ChatGPT Stock Screener Plugin
In this guide, we saw how to build a simple stock screener ChatGPT Plugin using the Financial Modeling Prep API. To recap, we:
- Created a Flask app with the necessary enpoints in the
main.pyfile - Defined our plugin's metadeta in the
ai-plugin.jsonmanifest file - Documented the API using OpenAPI, outlining the
/stock_screenerendpoint, parameters, and response schemas - Hosted the project at Replit and deployed it for testing in the Plugin store
There are still a few more step's we'd want to include to take a plugin like this to production, such as rate limiting and user authentication, which we'll cover in future tutorials.


