

My early developer access to ChatGPT Plugins has arrived...let the games begin.
In this guide, we'll walk through OpenAI's plugin documentation and see how we can build our first simple to-do list ChatGPT plugin, including:
- Building an API
- Creating a plugin manifest
- Documenting the API
In case you're unfamiliar, as OpenAI highlights:
Plugins are tools designed specifically for language models with safety as a core principle, and help ChatGPT access up-to-date information, run computations, or use third-party services.
ChatGPT plugins open up such an incredibly wide range of opportunities, a few of which include:
- Retrieve real-time information: i.e. news, stock/crypto prices, or anything else you can browse for
- Retrieve knowledge base information: i.e. your personal notes, company knowledge base, and so on
- Perform actions: i.e. book a taxi, order food, and so on
In order to create a plugin, you'll need to expose an API endpoint, a manifest file, and an OpenAI specification to ChatGPT.
These allow you to specify what the plugin can do and enable ChatGPT to read and decide when to make an API call to your plugin. As OpenAI writes:
The AI model acts as an intelligent API caller. Given an API spec and a natural-language description of when to use the API, the model proactively calls the API to perform actions.
There are several example plugins OpenAI provides in their documentation, although for this tutorial we'll just start with the basics and create a simple to-do list plugin.
Step 1: Build an API
First up, let's create a main.py file and just add the to-do list code that OpenAI provides in their documentation for demo purposes.
In this example, they use the Quart framework to create a simple to-do list API, which is:
...a Python ASGI web microframework with the same API as Flask.
It also uses the quart-cort package, which:
...is required to share resources in browsers due to the Same Origin Policy which prevents resources being used from a different origin.
First, we'll need to install these packages with pip install quart quart-cors. Next, here's a quick overview of the to-do list code:
Imports
First, we'll import the following packages
import json

import quart
import quart_cors
from quart import request
Initialize app
Next, we'll initialize the Quart web app and configure the CORS settings. We also set the allowed location to https://chat.openai.com, which means only requests from this domain will be accepted by the server.
# Note: Setting CORS to allow chat.openapi.com is required for ChatGPT to access your plugin
app = quart_cors.cors(quart.Quart(__name__), allow_origin="https://chat.openai.com")
Set global variable
Next, we'll declare a global variable _TODOS = {},which is a dictionary that will be used to store to-do items for each user.
Create, read, & remove to-do lists
Next, we'll first create several routes to create, read, and remove to-do lists for the user using CRUD operations as follows:
Create (add new to-do items for users)
@app.post("/todos/<string:username>")
async def add_todo(username):
    request = await quart.request.get_json(force=True)
    if username not in _TODOS:
        _TODOS[username] = []
    _TODOS[username].append(request["todo"])
    return quart.Response(response='OK', status=200)
Read (retrieve to-do lists for a user)
@app.get("/todos/<string:username>")
async def get_todos(username):
    return quart.Response(response=json.dumps(_TODOS.get(username, [])), status=200)
Delete (remove a to-do item)
@app.delete("/todos/<string:username>")
async def delete_todo(username):
    request = await quart.request.get_json(force=True)
    todo_idx = request["todo_idx"]
    if 0 <= todo_idx < len(_TODOS[username]):
        _TODOS[username].pop(todo_idx)
    return quart.Response(response='OK', status=200)
Next, we create routes for serving plugin files as follows:
Serve plugin logo
@app.get("/logo.png")
async def plugin_logo():
    filename = 'logo.png'
    return await quart.send_file(filename, mimetype='image/png')
Serve ai-plugin.json (the manifest file)
@app.get("/.well-known/ai-plugin.json")
async def plugin_manifest():
    host = request.headers['Host']
    with open("./.well-known/ai-plugin.json") as f:
        text = f.read()
        return quart.Response(text, mimetype="text/json")
Serve OpenAPI specification
@app.get("/openapi.yaml")
async def openapi_spec():
    host = request.headers['Host']
    with open("openapi.yaml") as f:
        text = f.read()
        return quart.Response(text, mimetype="text/yaml")
Run the app
Next, we'll run the app and set the debug, host, and port parameters as follows:
def main():
    app.run(debug=True, host="0.0.0.0", port=3333)


if __name__ == "__main__":
    main()
Okay now that we've got our simple to-do list API using Quart, let's move on to the next step: setting up our plugin manifest.
Step 2: Create a plugin manifest
Next, every ChatGPT plugin needs a ai-plugin.json file that needs to be hosted on the API's domain and located within a /.well-known folder.
For this example, we'll just be using localhost so we're able to use HTTP for testing purposes, although for production we'll need to point it to a remote server and use HTTPS:
{
  "schema_version": "v1",
  "name_for_human": "To Do List Plugin",
  "name_for_model": "todo",
  "description_for_human": "Plugin for managing a to-do list. You can add, remove and view your to do list.",
  "description_for_model": "Plugin for managing a to-do list. You can add, remove and view your to do list.",
  "auth": {
    "type": "none"
  },
  "api": {
    "type": "openapi",
    "url": "http://localhost:3333/openapi.yaml",
    "is_user_authenticated": false
  },
  "logo_url": "http://localhost:3333/logo.png",
  "contact_email": "support@example.com",
  "legal_info_url": "http://www.example.com/legal"
}
As you can see, we're not using any user authentication for this to-do list plugin, although there are several authentication options that you can find here.
Step 3: Document the API with an OpenAPI specification
Lastly, we need to document our API with an OpenAPI specification. Note that if you have an existing API, you don't need to expose the entire API functionality to ChatGPT, instead you can choose specific endpoints for your plugin.
For this example, we'll create a new openapi.yaml file for the to-do list app as follows. Also, note there are several tools to automatically turn your server definition code into an OpenAPI specification.
Here's the OpenAPI specification for the to-do list app:
openapi: 3.0.1
info:
  title: TODO
  description: A plugin that allows the user to create and manage a to do list using ChatGPT. If you do not know the user's username, ask them first before making queries to the plugin. Otherwise, use the username "global".
  version: 'v1'
servers:
  - url: http://localhost:3333
paths:
  /todos/{username}:
    get:
      operationId: getTodos
      summary: Get the list of todos
      parameters:
      - in: path
        name: username
        schema:
            type: string
        required: true
        description: The name of the user.
      responses:
        "200":
          description: OK
          content:
            application/json:
              schema:
                $ref: '#/components/schemas/getTodosResponse'
    post:
      operationId: addTodo
      summary: Add a todo to the list
      parameters:
      - in: path
        name: username
        schema:
            type: string
        required: true
        description: The name of the user.
      requestBody:
        required: true
        content:
          application/json:
            schema:
              $ref: '#/components/schemas/addTodoRequest'
      responses:
        "200":
          description: OK
    delete:
      operationId: deleteTodo
      summary: Delete a todo from the list
      parameters:
      - in: path
        name: username
        schema:
            type: string
        required: true
        description: The name of the user.
      requestBody:
        required: true
        content:
          application/json:
            schema:
              $ref: '#/components/schemas/deleteTodoRequest'
      responses:
        "200":
          description: OK

components:
  schemas:
    getTodosResponse:
      type: object
      properties:
        todos:
          type: array
          items:
            type: string
          description: The list of todos.
    addTodoRequest:
      type: object
      required:
      - todo
      properties:
        todo:
          type: string
          description: The todo to add to the list.
          required: true
    deleteTodoRequest:
      type: object
      required:
      - todo_idx
      properties:
        todo_idx:
          type: integer
          description: The index of the todo to delete.
          required: true
Step 4: Running the plugin
With these three files we're now ready to run the plugin. In this example, we'll just run it locally as we already set in the JSON file localhost:3333.To do so, we just need to:
- Run the app locally by running
python3 main.pyin your terminal - Go to ChatGPT and navigate to the Plugin store
- Select "Develop your own plugin" and enter
localhost:3333

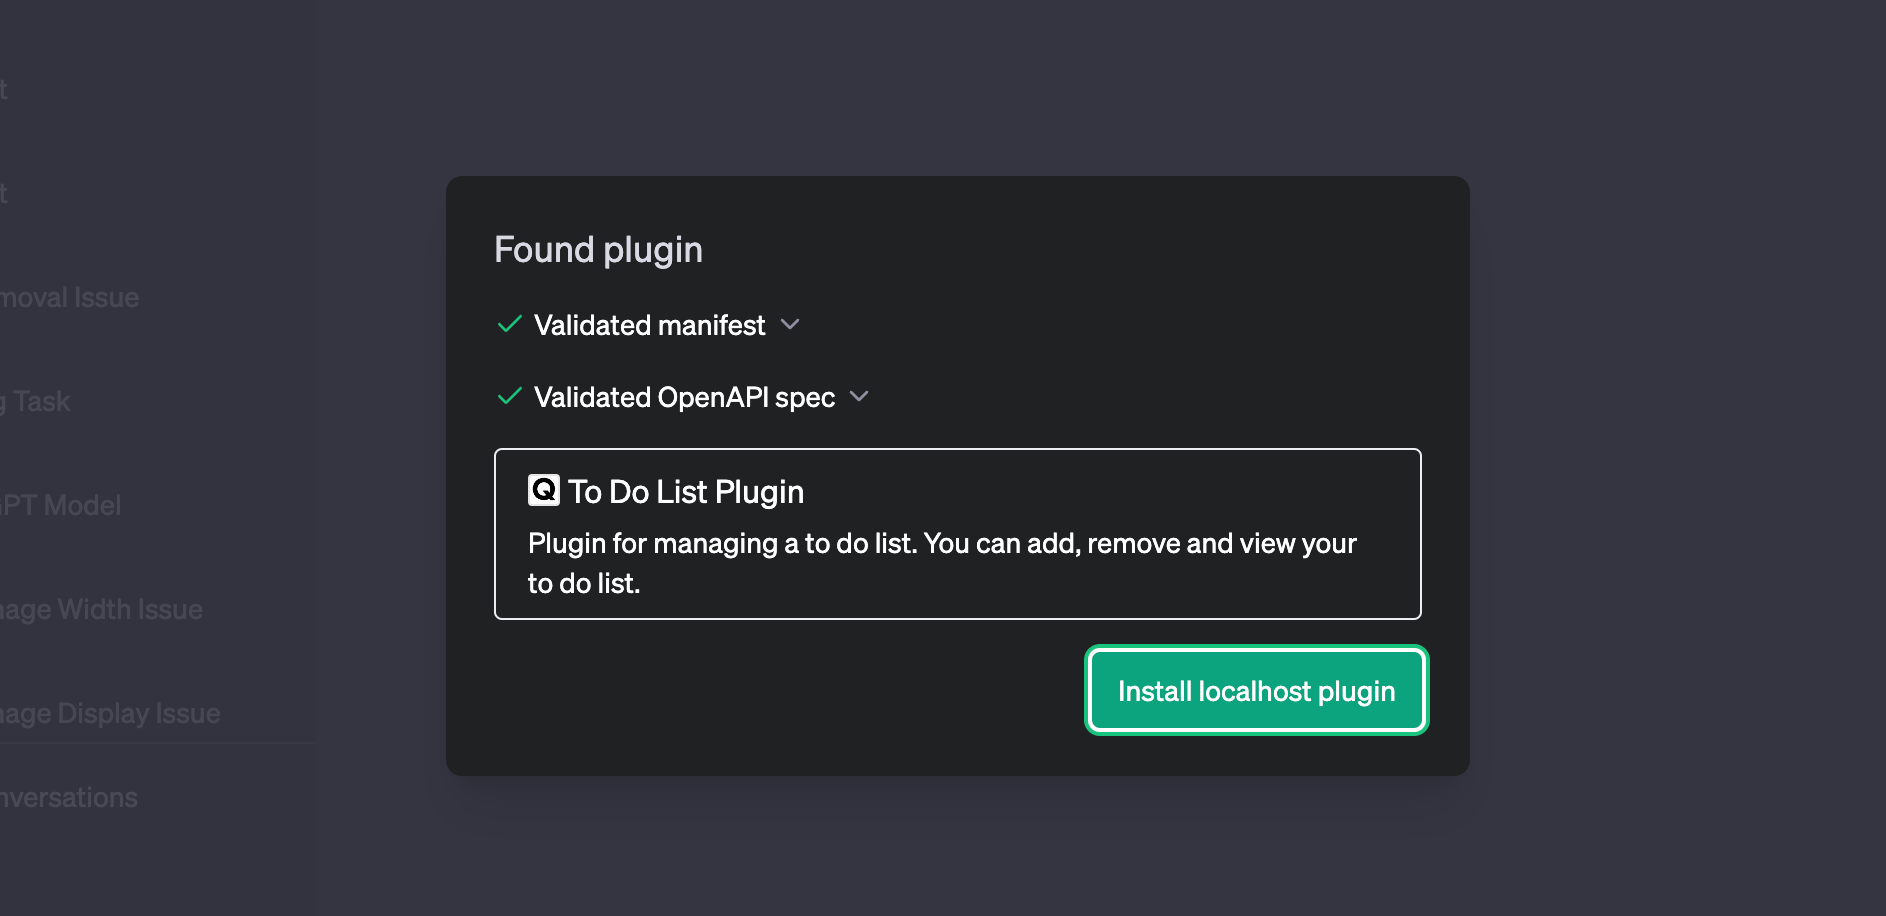
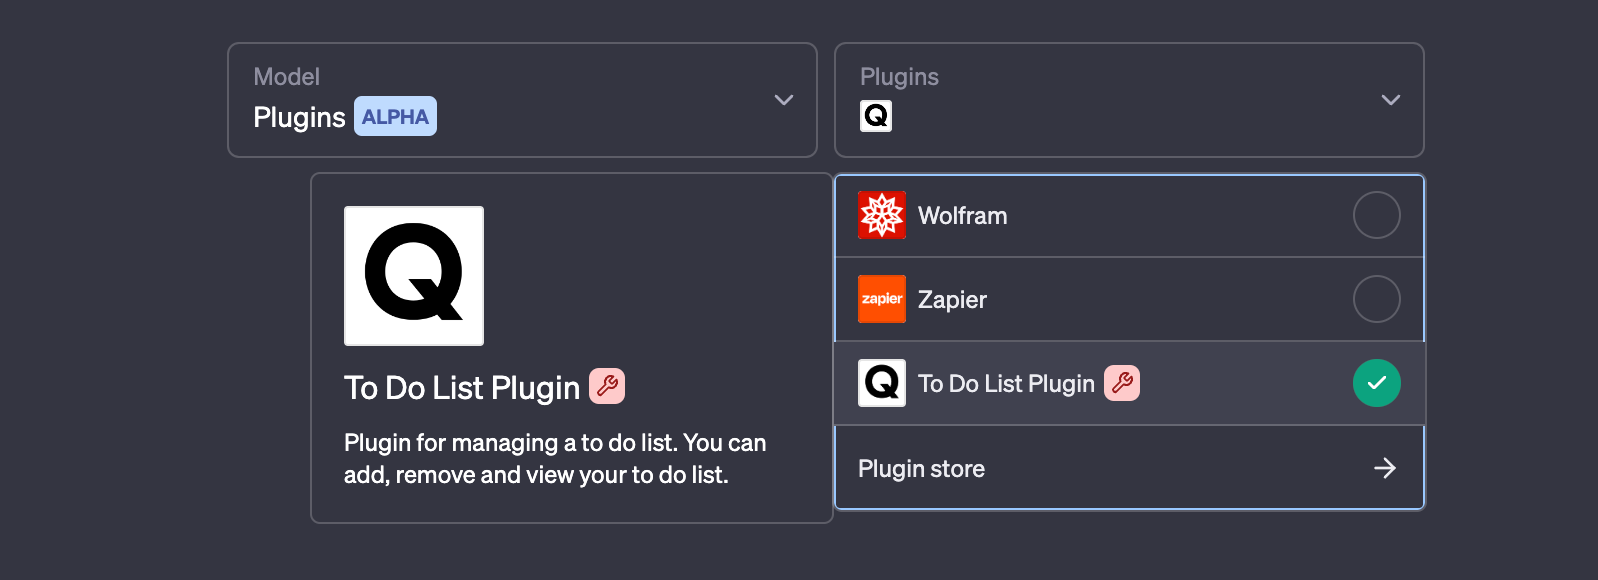
Now, we can enable our new to-do list plugin in your installed plugins dropdown:
Testing the plugin
After enabling our new plugin, let's go ahead and test it out:
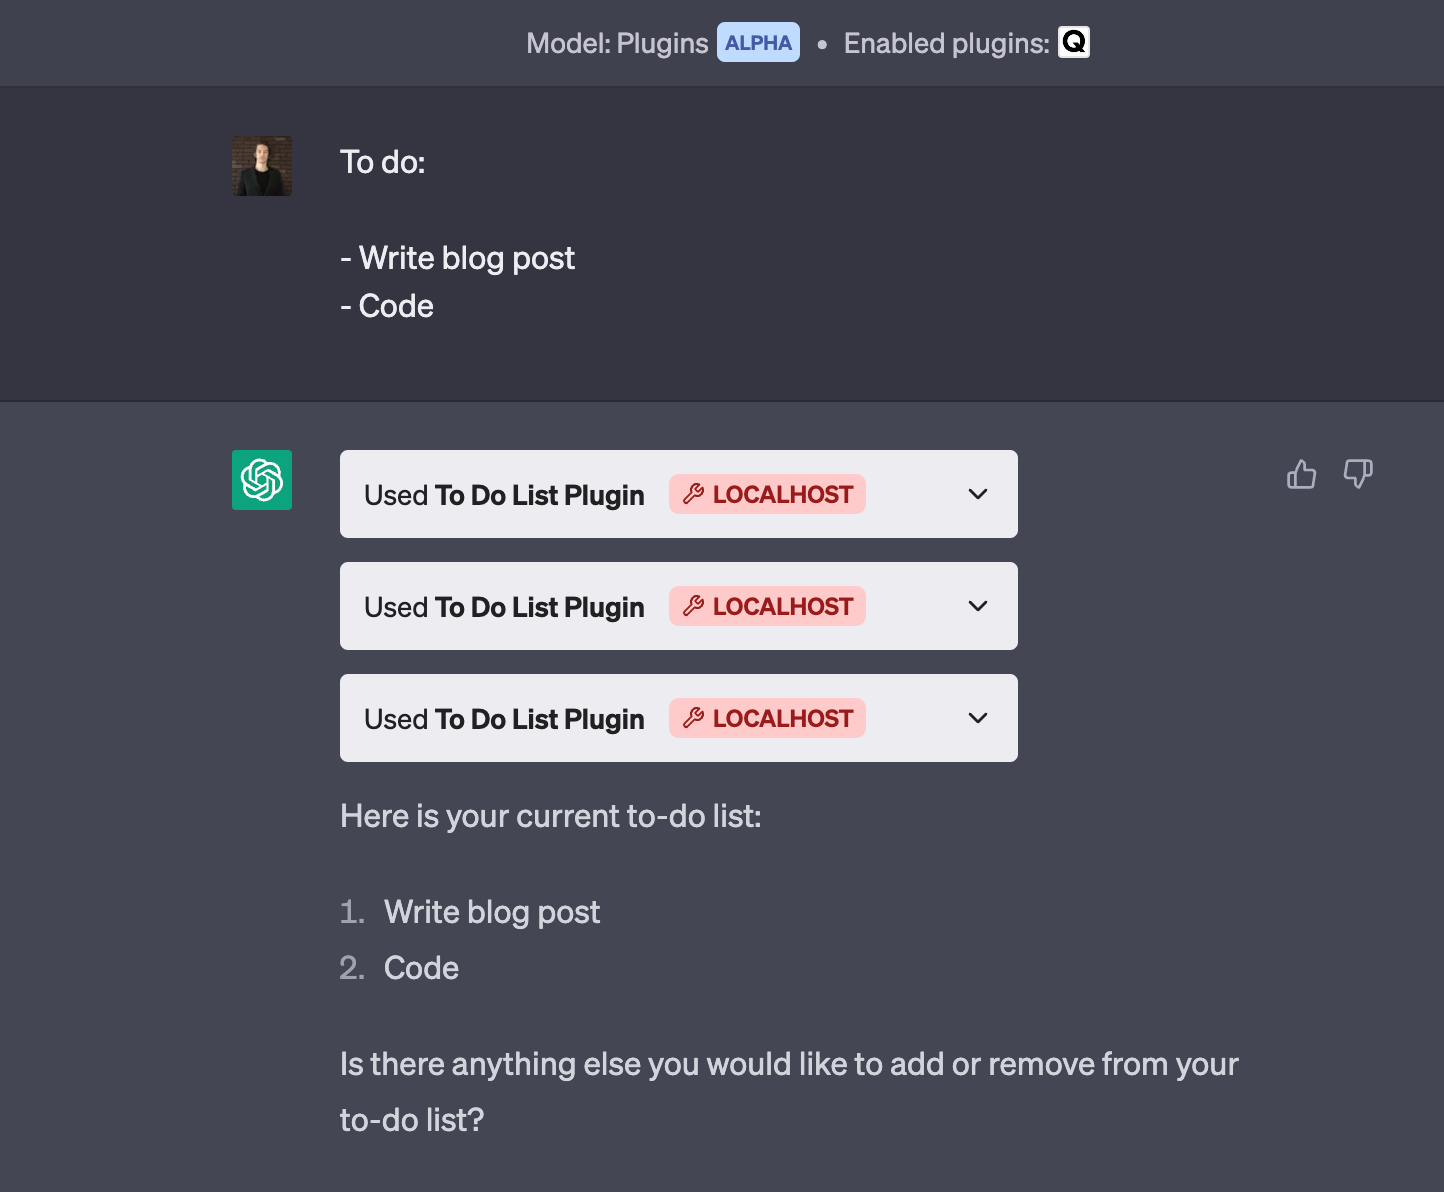
Success!
Alright now we've got the basics of setting up a ChatGPT plugin for testing purposes on localhost, but of course for production apps, we'll need a few more steps including exposing a public API for our app and setting up user authentication, but we'll save that for another article.
Summary: To-Do List ChatGPT Plugin
In this guide, we saw how we can quickly get started with building ChatGPT plugins with a simple to-do list app.
There are several other plugin examples you can check out here in OpenAI's documentation, and you can find the ChatGPT retrieval plugin for a more full-featured code example.
As mentioned, plugins open up ChatGPT to an incredibly wide range of new possibilities, so in the few articles, we'll expand on the basics and continue learning how to build out more advanced plugins.


