

In this guide we'll discuss the application of using deep reinforcement learning for trading with TensorFlow 2.0.
In this article, we'll assume that you're familiar with deep reinforcement learning, although if you need a refresher you can find our full list of RL guides here.
This guide is based on notes from this TensorFlow 2.0 course and is organized as follows
- Building a Deep Q-Learning Trading Network
- Stock Market Data Preprocessing
- Training our Deep Q-Learning Trading Agent
- Summary: Deep Reinforcement Learning for Trading with TensorFlow 2.0
1. Building a Deep Q-Learning Trading Network
To start, we'll review how to implement deep Q-learning for trading with TensorFlow 2.0.
Subscribe now
Project Setup & Dependencies
The first step for this project is to change the runtime in Google Colab to GPU, and then we need to install the following dependancies:
pip install tensorflow-gpu==2.0.0.alpha0
pip install pandas-datareader
Next we need to import the following libraries for the project:
import math
import random
import numpy as np
import pandas as pd
import tensorflow as tf
import matplotlib.pyplot as plt
import pandas_datareader as data_reader

from tqdm import tqdm_notebook, tqdm
from collections import deque
Stay up to date with AI
Defining our Deep Q-Learning Trader
Now we need to define the algorithm itself with the AI_Trader class, below are a few important points:
- In trading we have an action space of 3: Buy, Sell, and Sit
- We set the experience replay memory to
dequewith 2000 elements inside it - We create an empty list with
inventorywhich contains the stocks we've already bought - We need to set an
gammaparameter to0.95, which helps to maximize the current reward over the long-term - The
epsilonparameter is used to determine whether we should use a random action or to use the model for the action. We start by setting it to1.0so that it takes random actions in the beginning when the model is not trained. - Over time we want to decrease the random actions and instead we can mostly use the trained model, so we set
epsilon_finalto 0.01 - We're then set the speed of decreasing epsilon in the
epsilon_decayparameter
class AI_Trader():

  def __init__(self, state_size, action_space=3, model_name="AITrader"):

    self.state_size
    self.action_space = action_space
    self.memory = deque(2000)
    self.inventory = []
    self.model_name = model.name

    self.gammsa = 0.95
    self.epsilon = 1.0
    self.epsilon_final = 0.01
    self.epsilon_decay = 0.995
Defining the Neural Network
Next we need to start defining our neural network.
The first step to define our neural network is to define a function called model_builder which doesn't take any arguments, just the keyword self.
We then define the model with tf.keras.models.Sequential().
To define with model's states, which are the previous n days and stock prices of the days.
A state is just a vector of numbers and we can use a fully connected network, or a dense network.
Next, we add the first dense layer with tf.keras.layers.Dense() and specify the number of neurons in the layer to 32 and set the activation to relu. We also need to define the input shape in the first layer with input_dim=self.state_size
We're going to use 3 hidden layers in this network, so we add 2 more and change the architecture of to 64 neurons in the second and 128 for the last layer.
We then need to define the output layer and compile the network.
To define the output layer we need to set the number of neurons to the number of actions we can take, 3 in this case. We're also going to change the activation function to relu because we're using mean-squared error for the loss:
 def model_builder(self):

      model = tf.keras.models.Sequential()

      model.add(tf.layers.Dense(units=32, activation='relu', input_dim=self.state_size)
      model.add(tf.layers.Dense(units=64, activation='relu')
      model.add(tf.layers.Dense(units=128, activation='relu')
      model.add(tf.layers.Dense(units=self.action_space, activation='linear')
Finally, we need to compile the model. Since this is a regression task we can't use accuracy as our loss, so we use mse. We then use the Adam optimizer and set the learning rate to 0.001 and return the model:
model.compile(loss='mse', optimizer=tf.keras.optimizer.Adam(lr=0.001))
return model
To return the model we just need to add self.model = self.model_builer to our __init__ function. This function will create the network, initialize it, and store it in the self.model argument.
Building a Trading Function
Now that we've defined the neural network we need to build a function to trade that takes the state as input and returns an action to perform in that state.
To do this we're going to create a function called trade that takes in one argument: state.
For each state, we need to determine if we should use a randomly generated action or the neural network.
To do this, we use the random library, and if it is less than our epsilon we return a random action with random.randrange() and pass in self.action_space.
If the number is greater than epsilon we use our model to choose the action. To do this, we define actions equal to self.model.predict and pass in the state as the argument.
We then return a single number with np.argmax to return only the action with the highest probability.
To summarize:
- The function takes as input the shape and generates a random number
- If the number is less than or equal to
epsilonit will generate a random action (this will always be the case in the beginning) - If it is greater than
epsilonit will use the model to perform a prediction on the input state and return the action that has the highest probability
  def trade(self, state):
      if random.random() <= self.epsilon:
          return random.randrange(self.action_space)

      actions = self.model.predict(actions[0])
Training the Model
Now that we've implemented the trade function let's build a custom training function.
This function will take a batch of saved data and train the model on that, below is a step-by-step process to do this:
- We define this function
batch_tradeand it will takebatch_sizeas an argument - We select data from the experience replay memory by first setting
batchto an empty list - We then iterate through the memory with a for loop
- Since we're dealing with time series data we need to sample from the end of the memory instead of randomly sampling from it
- Now that we have a batch of data we need to iterate through each batch—
state,reward,next_state, anddone—and train the model with this - If the agent is not in a terminal state we calculate the discounted total reward as the current
reward - Next we define the
targetvariable which is also predicted by the model - Next we fit the model with
self.model.fit() - At the end of this function we want to decrease the epsilon parameter so that we slowly stop performing random actions
def batch_train(self, batch_size):

    batch = []
    for i in range(len(self.memory) - batch_size + 1, len(self.memory)):
      batch.append(self.memory[i])

    for state, action, reward, next_state, done in batch:
      reward = reward
      if not done:
        reward = reward + self.gamma * np.amax(self.model.predict(next_state)[0])

      target = self.model.predict(state)
      target[0][action] = reward

      self.model.fit(state, target, epochs=1, verbose=0)

    if self.epsilon > self.epsilon_final:
      self.epsilon *= self.epsilon_decay
2. Stock Market Data Preprocessing
Now that we've built our AI_Trader class we now need to create a few helper functions that will be used in the learning process.
In particular, we need to define the following 3 functions:
1. sigmoid - sigmoid is an activation function, generally used at the end of a network for binary classification as it scales a number to a range from 0 to 1. This will be used to normalize stock price data.
def sigmoid(x):
  return 1 (1 + math.exp(-x))
2. stocks_price_format - this is a formatting function to print out the prices of the stocks we bought or sold.
def stock_price_format(n):
  if n < 0:
    return "- # {0:2f}".format(abs(n))
  else:
    return "$ {0:2f}".format(abs(n))
3. dataset_loader - this function connects with a data source and pulls the stock data from it, in this case we're loading data from Yahoo Finance:
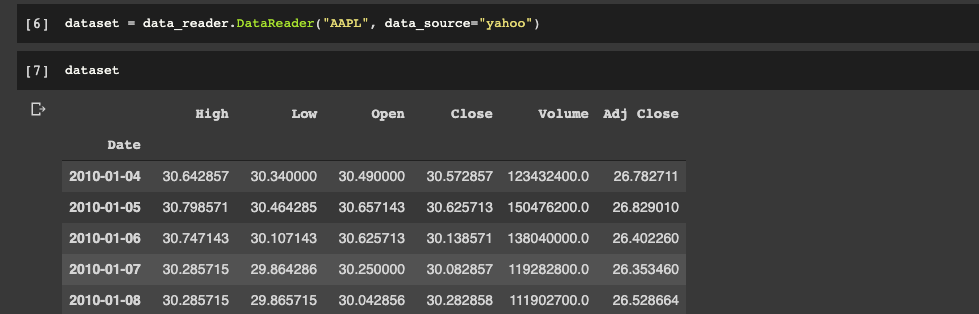
def dataset_loader(stock_name):

  dataset = data_reader.DataReader(stock_name, data_source="yahoo")

  start_date = str(dataset.index[0]).split()[0]
  end_date = str(dataset.index[1]).split()[0]

  close = dataset['Close']

  return close
Below we can take a look at the AAPL dataset. With this information we are going to build states for our network.
State Creator
Now that we have our dataset_loader function we need to create a function that takes this data and generates states from it.
Let's first look at how we can translate the problem of stock market trading to a reinforcement learning environment.
- Each point on a stock graph is just a floating number that represents a stock price at a given time.
- Our task is to predict what is going to happen in the next period, and as mentioned there are 3 possible actions: buy, sell, or sit.
This is regression problem - let's say we have a window_size = 5 so we use 5 states to predict our target, which is a continuous number.
Instead of predicting real numbers for our target we instead want to predict one of our 3 actions.
Next we're going change our input states to be differences in stock prices, which will represent price changes over time.
To implement this in Python we're going to create a function state_creator which takes 3 arguments: data, timestep, and window_size:
- We first need to calculate the
starting_id - When the
starting_idis positive we create a state and if it is negative we append the info until we get to thewindow_size - Next we define an empty list called
stateand iterate through thewindow_datalist. - As we append the state we need to normalize the price data with the
sigmoidfunction - To complete the function we return a NumPy array of the state
def state_creator(data, timestep, window_size):

  starting_id = timestep - window_size + 1

  if starting_id >= 0:
    windowed_data = data[starting_id:timestep+1]
  else:
    windowed_data = starting_id * [data[0]] + list(data[0:timestep+1])

  state = []
  for i in range(window_size - 1):
    state.append(sigmoid(windowed_data[i+1] - windowed_data[i]))

  return np.array([state])
Loading a Dataset
Now that we have our state_creator function we can load our dataset.
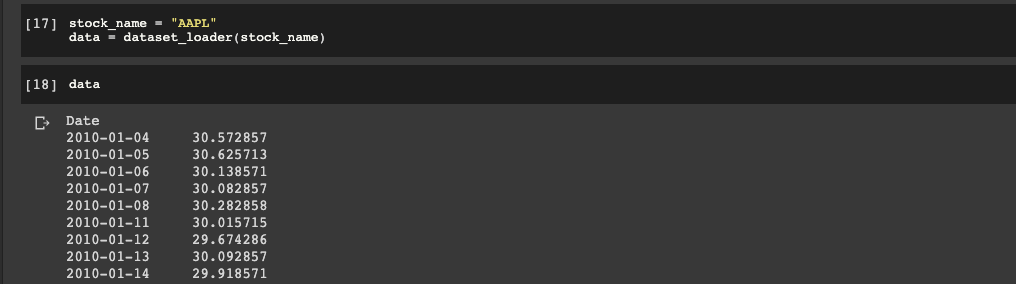
First we need to define a new variable called stock_name, and for this example we'll use AAPL.
Then we define a variable called data with our dataset_loader function:
3. Training the Q-Learning Trading Agent
Before we proceed to training our model, let's define a few hyperparameters, including:
window_size = 10
episodes = 1000

batch_size = 32
data_samples = len(data) - 1
Now it's time to define our trading agent, and let's take a look at a summary of the model:
trader = AI_Trader(window_size)
trader.model.summary()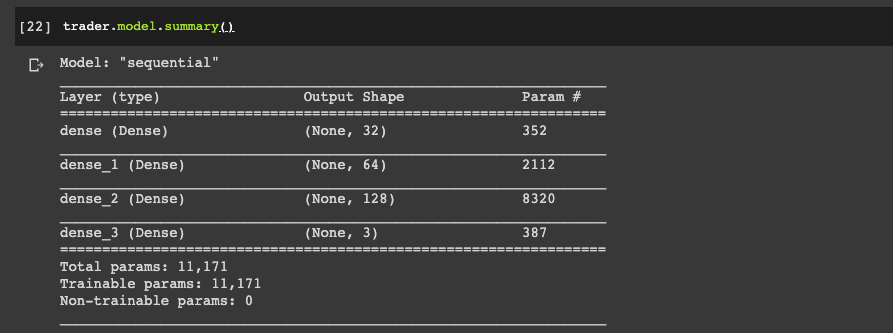
Defining a Training Loop
Now we need to train our model, which we're going to do with a for loop that will iterate through all of the episodes.
- Next we want to print out the current episode
- We then need to define our initial state with
state_creator - Then we define 2 variables so that we can keep track of
total_profitand we set our inventory to 0 at the beginning of an episode withtrader.inventory = [] - Next we define our timestep (1 timestep is 1 day) with a
forloop, which represents how many samples we have. To do this we need to define ouraction,next_state, andreward. - Then we want to update our
inventorybased on the givenaction - Based on the actions we can calculate our
rewardand update thetotal_profit - We then need to check if this is the last sample in our dataset
- Next we need to append all of the data to our trader's experience replay buffer with
trader.memory.append() - We then change the
stateto thenext_stateso we can iterate through the wholeepisode - Finally we want to print out the
total_profitifdone = Trueand add print statements to when we buy or sell and how what the profit is
There are two more things to do before starting the training process:
- We need to check if we have more information in our
memorythan ourbatch_size. If that is true we calltrader.batch_trainand pass in thebatch_sizeargument - We're then going to check if the number of episodes is divisible by 10, and if that is the case we're going to save the model with
trader.model.save()in an H5 file
for episode in range(1, episodes + 1):
print("Episode: {}/{}".format(episode, episodes))
state = state_creator(data, 0, window_size + 1)
total_profit = 0
trader.inventory = []
for t in tqdm(range(data_samples)):
action = trader.trade(state)
next_state = state_creator(data, t+1, window_size + 1)
reward = 0
if action == 1: #Buying
trader.inventory.append(data[t])
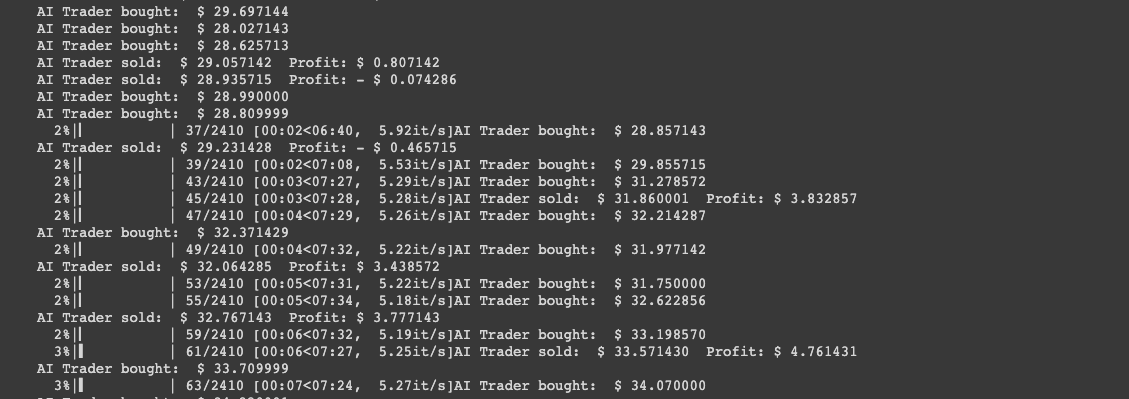
print("AI Trader bought: ", stocks_price_format(data[t]))
elif action == 2 and len(trader.inventory) > 0: #Selling
buy_price = trader.inventory.pop(0)
reward = max(data[t] - buy_price, 0)
total_profit += data[t] - buy_price
print("AI Trader sold: ", stocks_price_format(data[t]), " Profit: " + stocks_price_format(data[t] - buy_price) )
if t == data_samples - 1:
done = True
else:
done = False
trader.memory.append((state, action, reward, next_state, done))
state = next_state
if done:
print("########################")
print("TOTAL PROFIT: {}".format(total_profit))
print("########################")
if len(trader.memory) > batch_size:
trader.batch_train(batch_size)
if episode % 10 == 0:
trader.model.save("ai_trader_{}.h5".format(episode))
4. Summary: Deep Reinforcement Learning for Trading with TensorFlow 2.0
In this article, we looked at how to build a trading agent with deep Q-learning using TensorFlow 2.0.
We started by defining an AI_Trader class, then we loaded and preprocessed our data from Yahoo Finance, and finally we defined our training loop to train the agent.
Although this surely won't be the best AI trading agent of all time (and, of course, is not recommended to trade with), it does provide a good starting point to build off of.
To finish off, here are a few ways that we could improve this model:
- Adding trend following indicators to our input data
- We could use an LSTM network instead of simple dense layers
- We could use sentiment analysis with natural language processing to provide the model with more input data


